Week 2: 3D Modeling, Circuit Design, and Component Soldering
Smart Obstacle Avoidance Helmet Development Log - Week 2: 3D Modeling, Circuit Design, and Component Soldering
3D Modeling


We adopted a segmented design to minimize 3D printing curvature, optimize manufacturability, and reduce material strength requirements. Key design considerations include:
Segmented Structure: Reducing curvature allows for easier machine production, lowers material strength dependency, and minimizes the need for support structures. Bonus: it also makes the helmet easier to store and travel with.
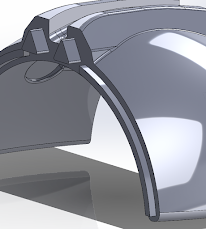
Interlocking Mechanism: Using triangular slots and inserts, reinforced with curved ridges, to enhance helmet stability and prevent lateral movement.
Ventilated Design: Ensures breathability and comfort while also reducing material consumption for a more eco-friendly approach.

- Dedicated Hardware Compartment: A specialized compartment at the rear of the helmet to house electronic components, ensuring their stability and protection from external interference.

- Ergonomic Fit: Customizable for different users to maximize adaptability and comfort.


 Sensor Placement Strategy:
Left forehead, tilted 45° left
Right forehead, tilted 45° right
Front forehead, straight ahead
Front forehead, tilted 50° downward
This configuration enables the helmet to accurately detect surrounding obstacles and assess road slope variations, reducing the risk of accidents due to uneven terrain.
Challenges and Optimization
Initially, we attempted a segmented printing approach to optimize structure and assembly, but it led to stability issues and weak joints, compromising durability.
The fisrt attempt:

The second attempt:

After multiple failures, we revised the design and ultimately opted for a one-piece print, ensuring better structural integrity and successful fabrication with a higher-quality filament.
The third attempt is underway...
Circuit Design


- STM32 microcontroller: Manages sensor data processing and system control.
ToF400C laser distance sensor: Ensures high-precision distance measurements.
Power Supply: Rechargeable lithium battery for sustained operation.
Feedback System: Buzzers and a voice module for clear and intuitive alerts.


Component Soldering
We used manual soldering for assembling the circuitry. However, initial tests revealed unstable connections with the DuPont wires, leading to intermittent contact issues. To resolve this:
Wire Trimming: We used a flush cutter to refine the wire ends, improving connectivity.
Stabilization Measures: Applied electrical tape to secure loose connections and prevent shifting.
Conclusion
This week, we focused on 3D modeling, circuit design, and soldering, tackling challenges like material weaknesses and connection stability. With these optimizations in place, we are now gearing up for software development and distance measurement testing to ensure precise, real-time obstacle detection. Stay tuned for the next phase!


评论
发表评论